How to Spend Two Days in Yosemite National Park
It took me 9 years of living in California to finally make it to Yosemite. I know, it’s blasphemous. But I finally made it there in September 2019 and it was certainly worth the wait. And while we only had 2(ish) days in the park, we made the most of it, and I managed to pull together another great itinerary, if I do say so myself.
So, if you’re looking for inspiration on how to spend two beautiful days in the park, keep reading. If you want to cut right to the chase and get the logistical details (as of Summer 2026), you can use the table of contents to skip ahead to the section about everything you need to know about visiting the park—whether you’re a resident or non-resident.
Day 1: Los Angeles to Yosemite
We left Los Angeles for Yosemite around 8am (my itinerary called for 7am, but that was purely aspirational) and made it to the park entrance by around 2pm. Our first stop was Wawona, where we stretched our legs at the visitor center and refilled our water bottles at the historic Wawona Hotel (pro tip: there are water spigots behind the main building). If you have a little extra time here, I highly recommend adding the Wawona Swinging Bridge Trail to your itinerary. It’s an easy, mostly flat stroll (roughly 0.5–1 mile depending on how far you wander) to a picturesque bridge over the South Fork of the Merced River, and in the summer, it’s one of the best spots in the park to cool off with a quick dip or just soak your feet. We briefly considered pivoting to Mariposa Grove, but I promised Mark we’d save that for our next Yosemite trip—we still had a few more stops before finally settling into our cabin at Curry Village.
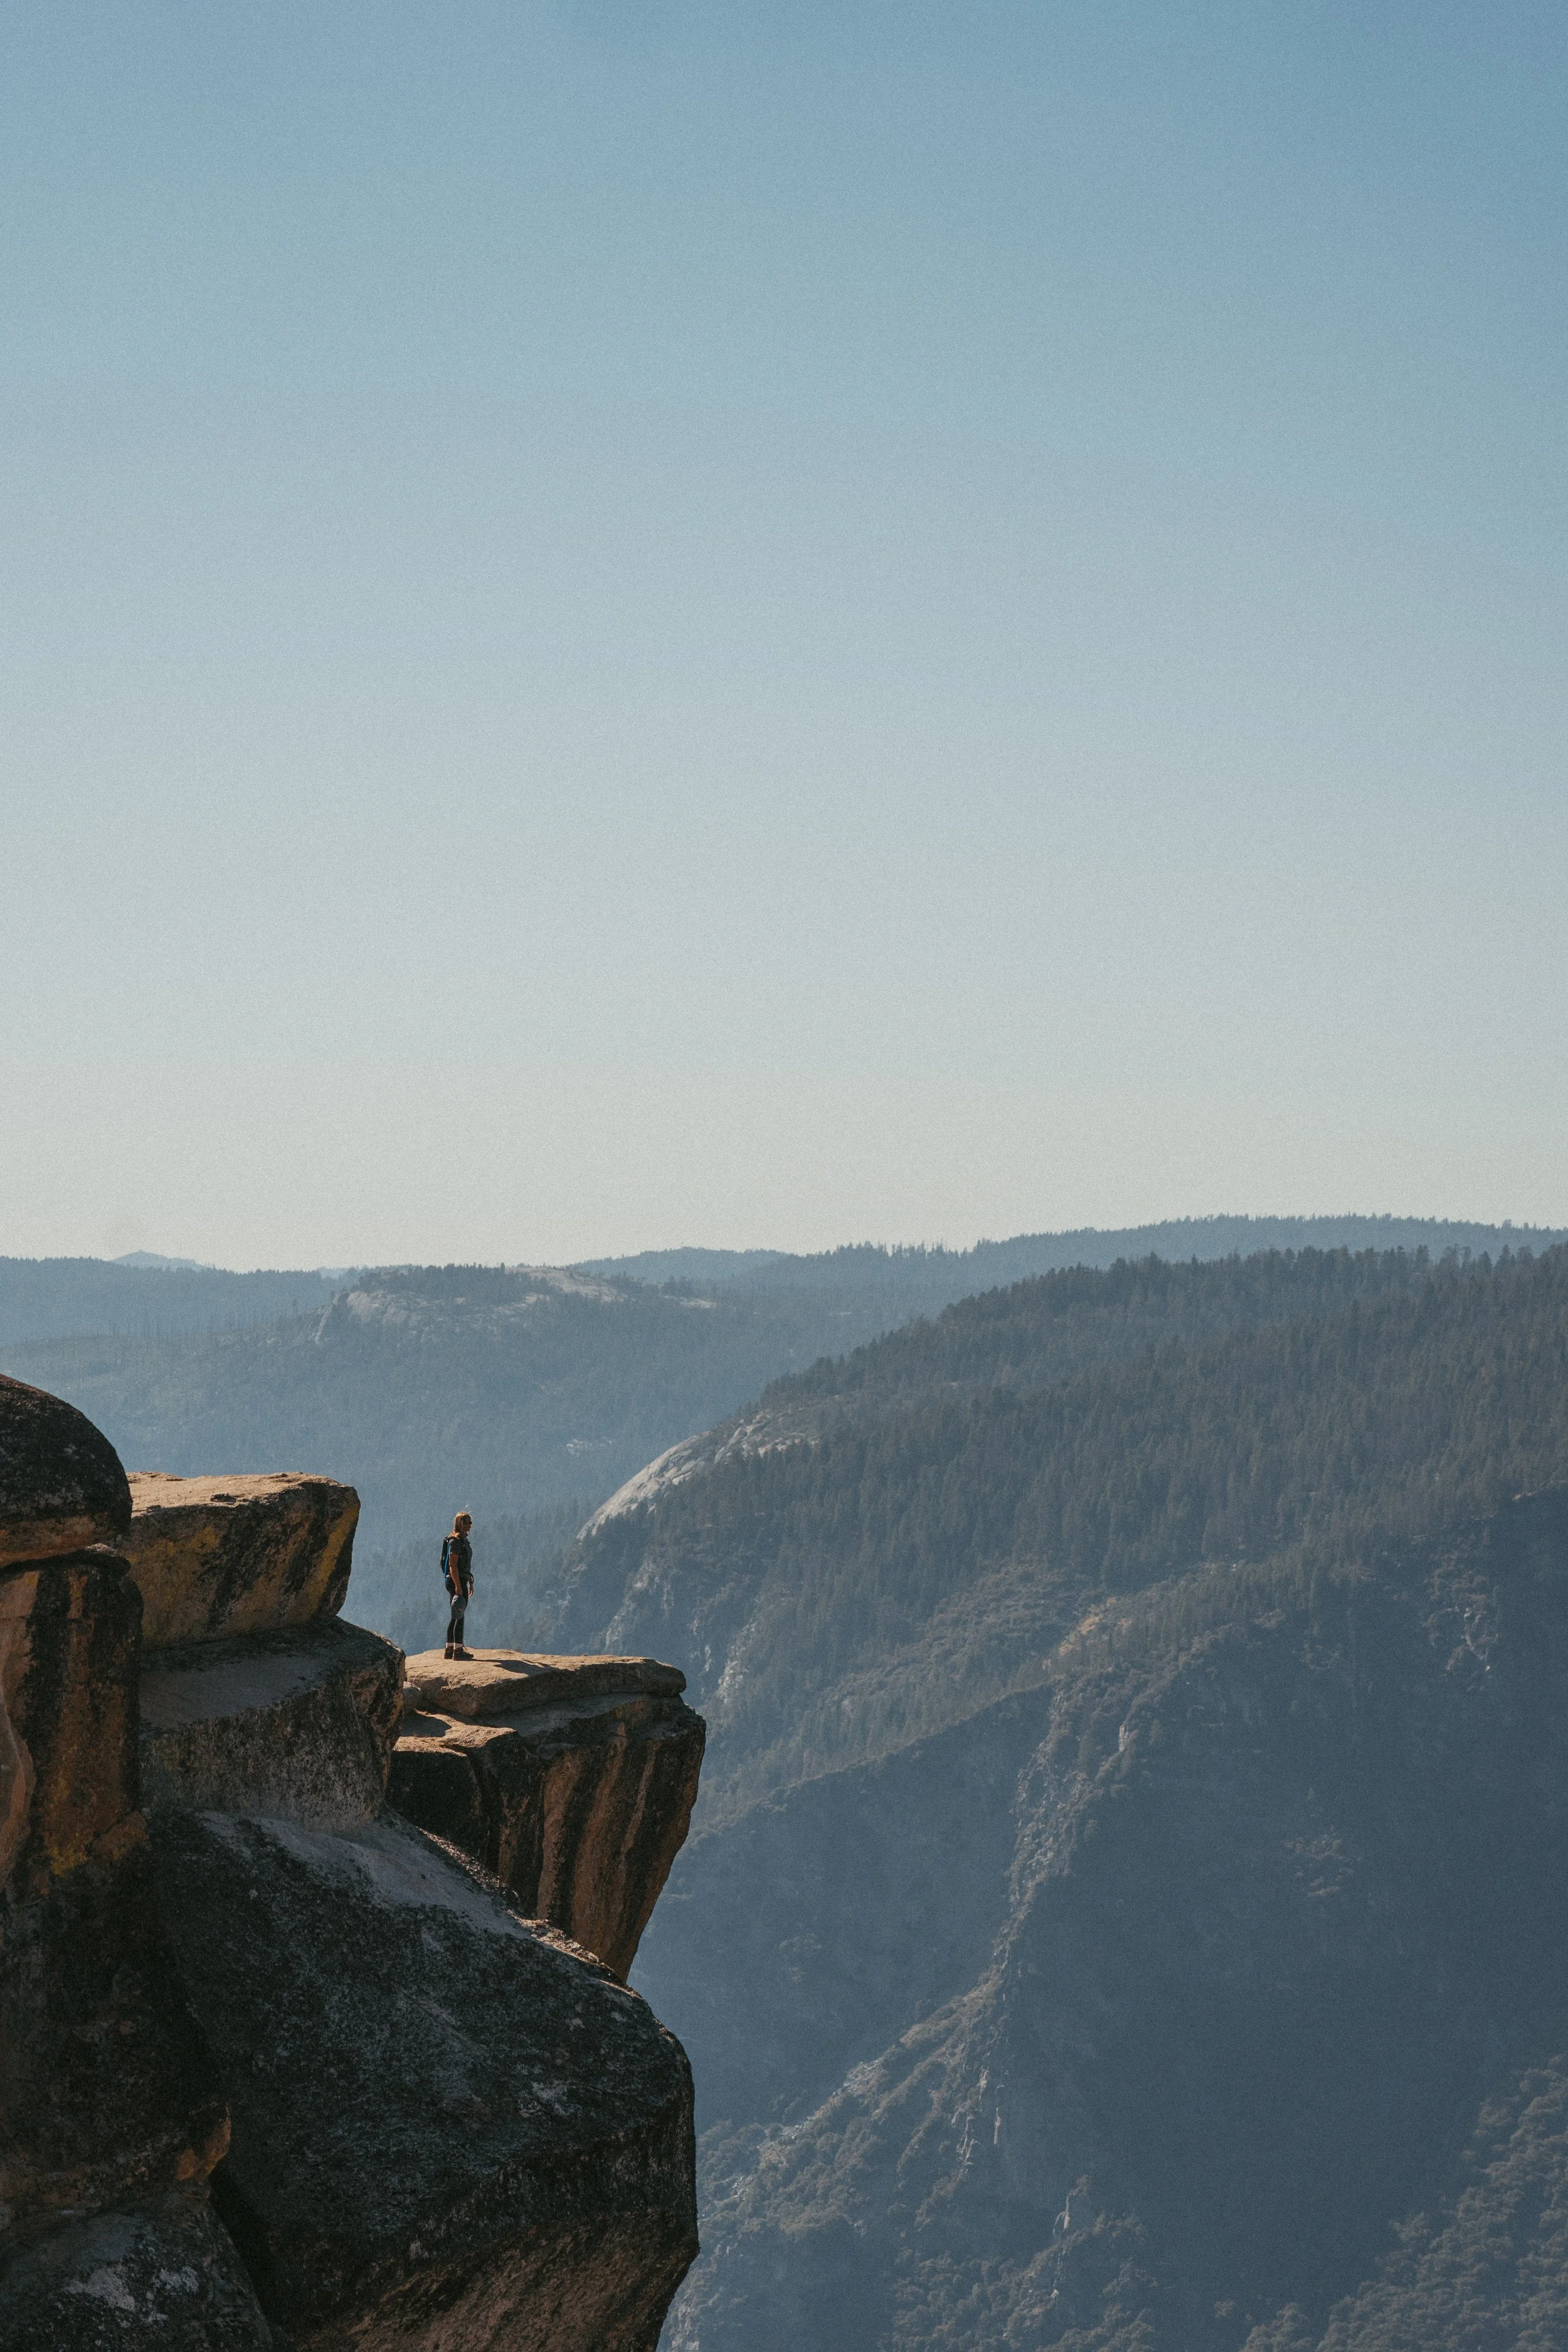
From Wawona, we made our way toward the Taft Point trailhead. Depending on traffic, the drive typically takes about 45 minutes to an hour, but Yosemite timing always comes with an asterisk. This was a non-negotiable stop for us, and it absolutely delivered. At just 2.3 miles round trip with around 410 feet of elevation gain, Taft Point is one of those rare hikes that offers maximum reward for relatively minimal effort. The panoramic views over Yosemite Valley are unreal, especially as the afternoon light starts to shift. That said, this is not a place to get too comfortable near the edges—there are sheer drop-offs throughout, especially around the famous fissures, so extra caution is a must if you’re hiking with kids. We arrived around 3pm, lingered for about 45 minutes as the light turned golden, and watched slackliners inch their way across the valley below, which somehow made the whole scene feel even more surreal.

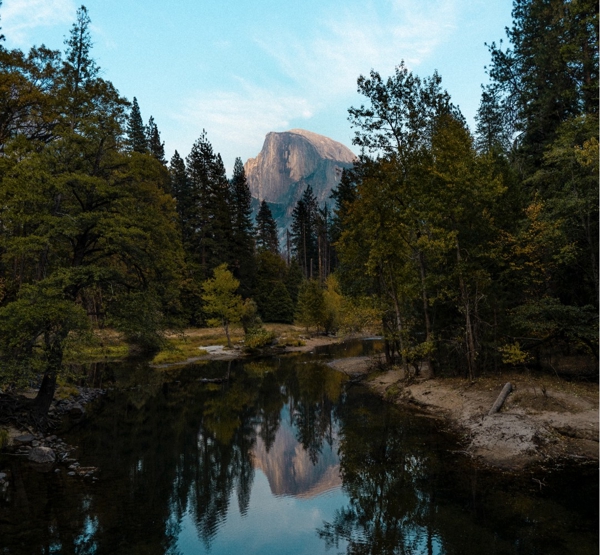
After Taft Point, we made our way up to Glacier Point. During this trip (August 2019) the road to Glacier Point was open for cars. There are times throughout the year due to weather and crowds when the road is closed and you have to take a shuttle to access. Glacier Point is a much busier tourist attraction, but a must-see nonetheless. The views of half-dome are incredible from this spot.

As the sun was getting lower, we decided to head down to the Valley in an attempt to make it to Curry Village before dark. However, after about 30 minutes of driving, we exited Wawona Tunnel and absolutely had to pull off and stop at Tunnel View - the sunset colors washing over the valley were just too beautiful to pass by in the car. Another must-see, iconic park vista (TBH they all are) looking out over both El Capitan and Half Dome in the distance, you can’t help but suddenly feel so very small.

We finally made it down to Curry Village around 8pm. It was in fact dark as we checked into our cabin, and one of us was a little hangry. The Curry Village patio was the only option nearby for dinner, and the line was incredibly long, but after a long wait, and some grumbling, we managed to grab a table and some tasty pizza and all was right in the world again.
Day 2: Yosemite Valley
Our second day in the park would be our only full day, so I of course, planned a nice big hike. We woke up early and had a hardy breakfast in the Village and then caught a quick bus ride to the Happy Isles stop (YARTS stop #16).
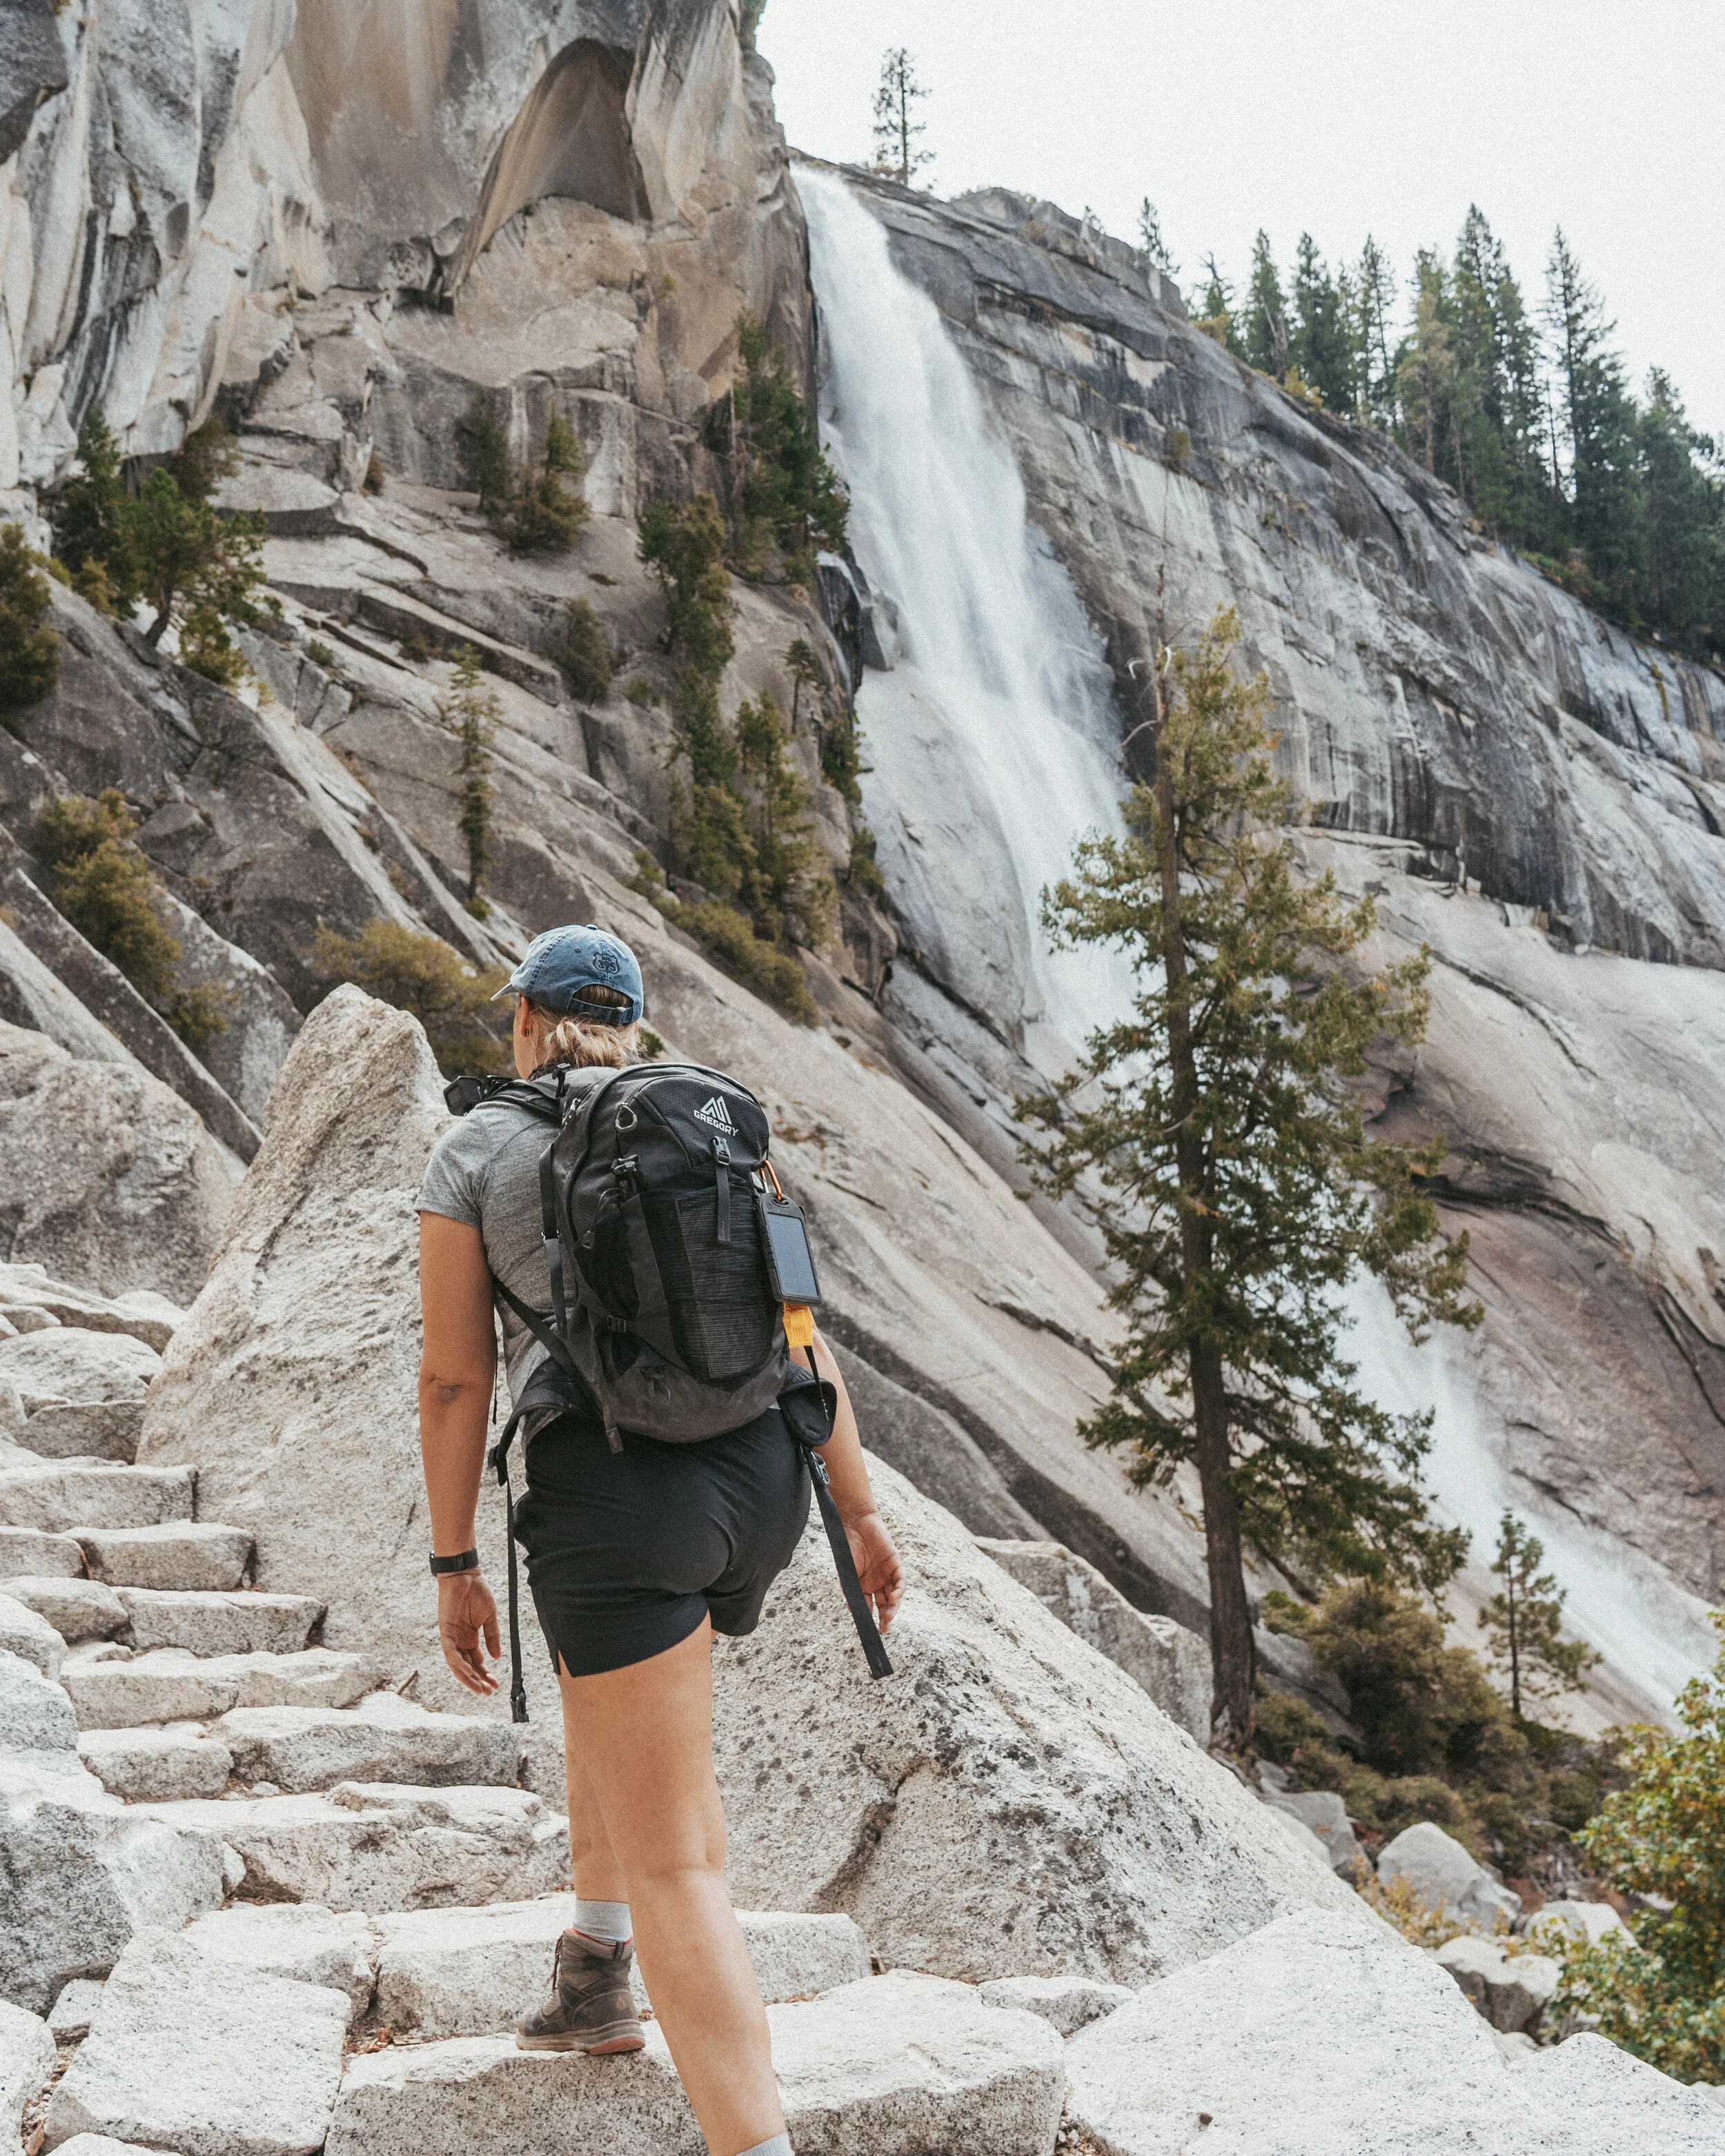
Nevada Falls via the Mist Trail is a big, fairly difficult trail. We clocked 9.2 miles and 2,664 ft. of elevation, not to mention, at least 1/4 of the trail is on a very slippery stone staircase skirting up towards the top of Vernal falls. In most cases, you will want some water-resistant clothing. However, water flow was fairly low during our trip, so we opted to just bring our raincoats along in our packs to be safe.
The beginning of this trail takes you along the Merced River for a bit before hiking up a fairly steep section that leads to a wooden footbridge. The footbridge has some beautiful views. Around .8 miles in you will arrive at another bridge where you will get your first view of Vernal falls. This is always a good time to re-stock on water or take a breather before continuing on.

Around 1.5 miles into your hike you’ll arrive at the top of Vernal Falls. The last .5 mile should have been a good indicator of why the trail is called Mist Trail. From the top of Vernal Falls, you will continue on to Nevada Falls. As we headed out, we decided to have a break next to Emerald Pool. This was a great spot to give our legs a rest and refuel with some snacks.
After another 2 miles (and some seriously steep, rocky switchbacks (that Mark might have considered grounds for divorce) we made it to the top of Nevada Falls. The view from the top of these falls is incredible. We spent some time here taking pictures, picking up trash (not so fun) and meeting friendly squirrels. After a good half hour taking in the views, it was time to descend back to camp.

We opted to take the John Muir Trail back down to get some fresh scenery - plus the idea of walking back down the slippery Vernal Falls steps didn’t seem like a great idea. It is another 4 miles back down from the John Muir Trail, but the views of Liberty Cap and Nevada Falls made it 100% worth it.

When we finally arrived back at camp, our feet and legs were spent. We went straight to the patio to grab a lite late lunch and give our dogs a break.
That night, we planned to have a nice dinner at the Ahwahnee Hotel. After our big hike, we deserved it.
Day 03- Heading Back Home
I always wake up on the last day of a short trip trying to convince myself to stay just one more day. It’s never easy to get back on the road—especially when you’re in a place like Yosemite.
Nonetheless, after one last big breakfast, we packed up the car and began our departure from the park. Don’t get me wrong though, it was a very long and drawn out departure. Yosemite Falls was actually already just a trickle by late August of this year, so we skipped it on this trip. But I highly recommend hiking the Lower Falls Trail at the very least. Our first stop was to investigate Yosemite Valley Village. We popped into the village market to purchase some souvenirs of course and also made our way to the Ansel Adams Gallery (highlight recommend).
As we continued around the loop, we made sure to get out and do some exploring by foot around the El Capitan Picnic Area. There, we spent some time with other visitors straining our eyes searching for the tiny specks of climbers dotted along El Cap’s sheer wall.

Our last stop for the day was Bridalveil Falls. This year-long flowing waterfall, named for the mist that wafts off it when the breeze blows, resembles the veil of a bride. There is a designated parking area, however it does tend to fill up during busier seasons, and in that case you may find parking further down the road. To get to the base of the falls follow the paved trail, taking a right at the only junction. If you take the trail to the left you will cross a series of bridges over Bridalveil Creek and get nice views of the waterfall on the way to an alternate trailhead along Highway 41 (without a parking lot). The trail to the right rises gradually through the forest along Bridalveil Creek, and drops you closer to the waterfall with every step. The trail ends at a viewpoint that is incredibly close to the falls - if you’re here during the spring or summer months, you will certainly feel the mist. By early fall (which is when we were visiting), the waterfall slows but it is still a beautiful site to see! *Bridalveil Falls is currently closed until May 2021 due to a restoration project.
After spending sometime at Bridalveil Falls we begrudgingly decided it was time to head back to Los Angeles the same way we came (if you want to read about taking Tioga road out of the park, check out my other Yosemite Guide). Of course, as we continued out of the park, we couldn’t help but stop for more photos at Tunnel View and various other turnouts.

If you’re looking for more Yosemite inspiration, make sure to check out my other blog posts:


Park Entry + Passes
The biggest update for 2026? Yosemite is no longer requiring advance vehicle reservations to enter the park. That means no timed entry permit, no mad dash to snag reservations online, and yes—you can technically be spontaneous.
That said, just because you can wing it doesn’t mean you should—especially in summer.
To enter Yosemite, you’ll still need to purchase an entrance pass, either online in advance through Recreation.gov / the National Park Service or at any Yosemite entrance station when you arrive (note: Yosemite is cashless, so bring a credit card or mobile payment).
For U.S. Residents:
Private vehicle: $35 (valid for 7 consecutive days)
Individual entry (bike / foot): $20
Yosemite Annual Pass: great if you plan to visit Yosemite more than once
America the Beautiful Pass: best value if you visit multiple national parks throughout the year
For International / Non-U.S. Residents:
2026 introduced a new nonresident fee structure at Yosemite and several other high-visitation parks.
If you're visiting from outside the U.S.:
Standard park entry fees still apply plus an additional $100 per person (ages 16+)
OR you can purchase the nonresident annual America the Beautiful pass, which may make more sense depending on your trip plans
A few important distinctions:
Park entry pass ≠ lodging reservation
Park entry pass ≠ campground reservation
Park entry pass ≠ wilderness permit
If you're staying overnight in the park, camping, or backpacking, those reservations still need to be booked separately.
My advice? Buy your pass ahead of time if you can. One less thing to deal with at the gate, especially on a busy summer morning.

Where to Stay
If this is your first Yosemite trip, deciding where to stay can shape your entire experience.
Staying Inside the Park
Best if you want early trail access, less driving, and easier logistics.
Popular options include:
The Ahwahnee
Yosemite Valley Lodge
Curry Village
Housekeeping Camp
Yosemite campgrounds
Pros:
Minimal commuting
Easier sunrise / sunset access
Better if you want to explore Yosemite Valley without moving your car constantly
Cons:
Books very far in advance
More expensive
Limited availability in peak summer
Staying Outside the Park
A great option if you're booking last minute, road tripping, or trying to save money.
Popular gateway towns:
El Portal (closest to Yosemite Valley)
Fish Camp (great if entering via the south entrance / Mariposa Grove)
Oakhurst
Mariposa
Groveland
This option usually means earlier mornings and more drive time, but can be much easier to book.
Getting Around Yosemite
Summer Yosemite traffic can be… character building.
If you’re staying outside the park, a car gives you the most flexibility—but once Yosemite Valley parking fills, it can become a headache.
Here are your options:
Driving
Best for:
Families
Flexible itineraries
Exploring beyond the Valley (Glacier Point Road, Tioga Road, Wawona, Tuolumne Meadows)
My advice? Get in early. Like gate-by-7am early on summer weekends.
Yosemite Shuttle
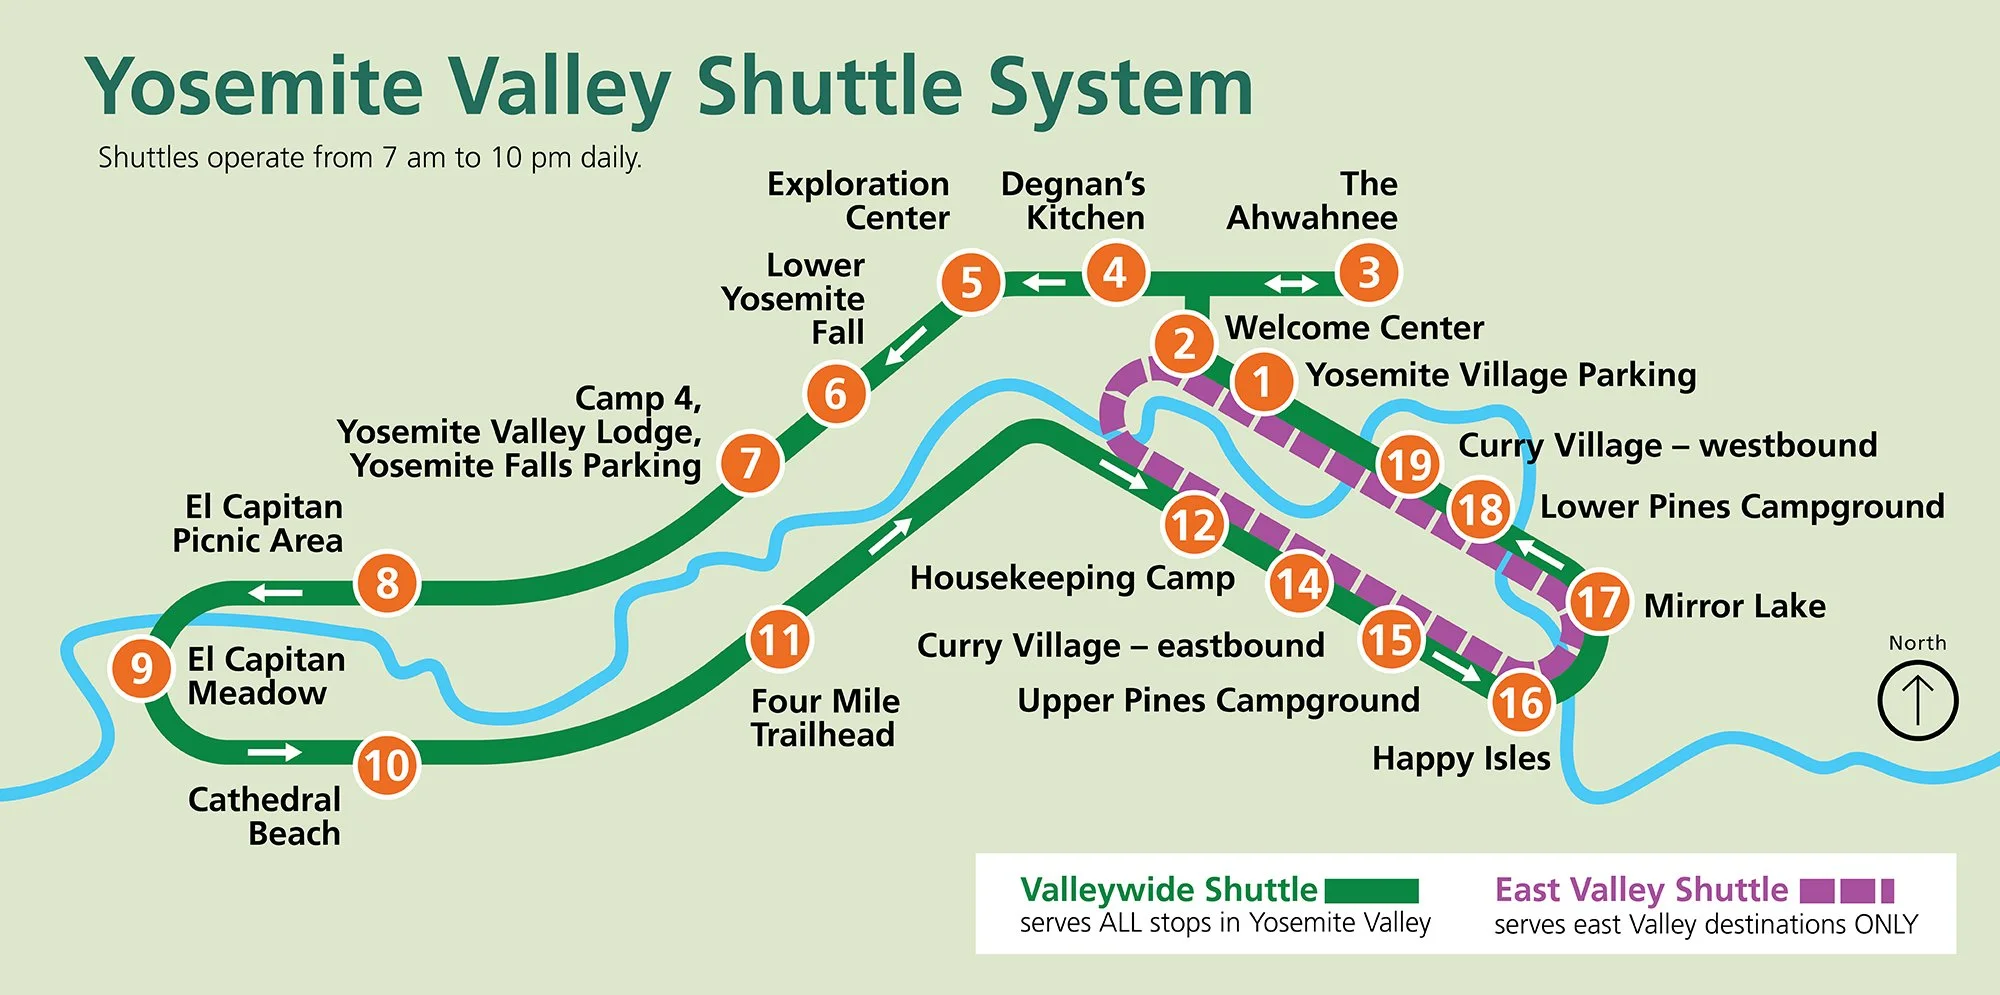
https://www.nps.gov/yose/planyourvisit/publictransportation.htm
Once you're in Yosemite Valley, the free shuttle can be super helpful for hopping between trailheads, visitor areas, and major landmarks without moving your car.
Best for:
Valley sightseeing days
Avoiding parking chaos
First-time visitors
YARTS (Public Transit Into the Park)
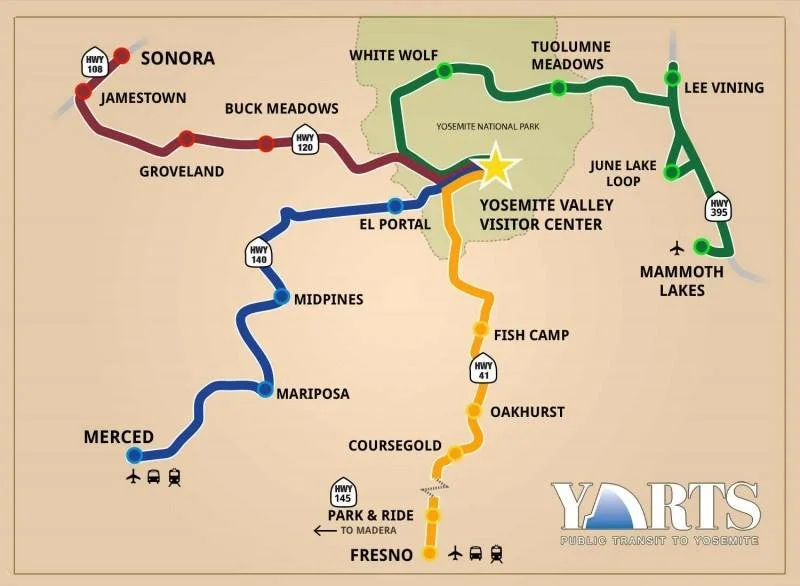
If you don’t want to drive into Yosemite—or just want to skip some of the traffic—YARTS is a legit option.
It connects Yosemite with gateway communities and larger transit hubs outside the park.
Best for:
Car-free travelers
Day trips
Visitors who don’t want to deal with Valley parking
(Just make sure schedules align with your plans.)
Bring a Bike
This is honestly one of my favorite Yosemite hacks.
Biking around Yosemite Valley is so much less stressful than moving your car every time you want to stop somewhere. Plus, you get to actually enjoy the scenery instead of sitting in traffic.
If you’re staying in or near the Valley: highly recommend.
Best Time of Year to Visit
There’s no bad time to visit Yosemite—just different tradeoffs.
Spring (April–June)
My personal favorite for waterfalls. Snowmelt means Yosemite is dramatic in the best way, but some higher elevation roads may still be closed.
Best for:
Waterfalls
Cooler hiking temps
Fewer crowds (early spring)
Summer (July–September)
Best for full park access—Tioga Road, Tuolumne Meadows, Glacier Point, alpine hikes—but also peak crowds.
Best for:
First-time visitors
High country adventures
Full itinerary flexibility
Tradeoff:
Crowds. Lots of them.
Fall (Late September–October)
One of Yosemite’s most underrated seasons.
Smaller crowds, crisp weather, and still-great hiking conditions.
Best for:
Fewer people
Pleasant temps
Photography
Winter (November–March)
A completely different Yosemite experience.
Peaceful, moody, beautiful—but with road closures and more weather variables.
Best for:
Snow lovers
Cozy park stays
A quieter Yosemite experience


